Advanced User Groups – The Quick Start Guide
Let us introduce to you one of the latest developments to : Advanced User Groups.
Advanced User Groups allows users to segment an account into multiple groups with their own roles and permissions. Rules can then be applied to these groups to include or exclude items within .
Keep reading for our step by step guide that will help explain the new features and how you can best make use of them.
Why Use Advanced User Groups?
This feature allows you to completely segment an account. In doing so, you can improve user workflows and management of the digital signage network.
In our example below, we have a fictional company called ‘ABC Inc’. ABC Inc have offices in London and New York. They have one account but want the London and New York offices to have control over their own digital signage without either location having access to the other.
They need Advanced User Groups to segment their account to the relevant users in the relevant offices. So, let’s begin to segment our dummy account:
The Setup Process:
The first thing to understand is the process of what we are about to set up, which is:
- Create User Roles – where we define what permissions users can have on an account
- Create Users – adding people to the account
- Create User Groups – where we segment the users into groups and set rules for the group
- Assign items to Groups – where we tag the individual items or folders to be seen / not seen by users in that group
1. Create User Roles
ABC Inc know that they have four key types of users they want to create:
- Admin – the users that will have full access and control
- IT Technicians – the users that will be responsible for maintaining the devices
- Creatives – the users responsible for creating content for the digital signage
- Communications – the users that review all content and decide what goes where and when
Now we know the types of user roles needed for the account, we can set them up via:
Admin Role:
This is setup on every account by default.
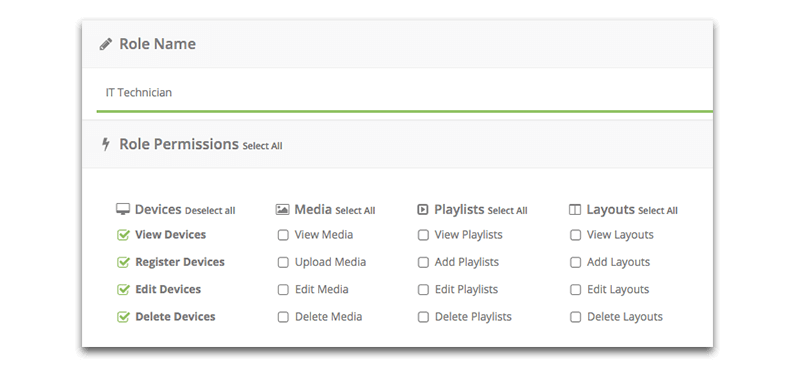
IT Technician Role:
Setting up the IT Technician role, we allow access to: View, Register, Edit and Delete devices.
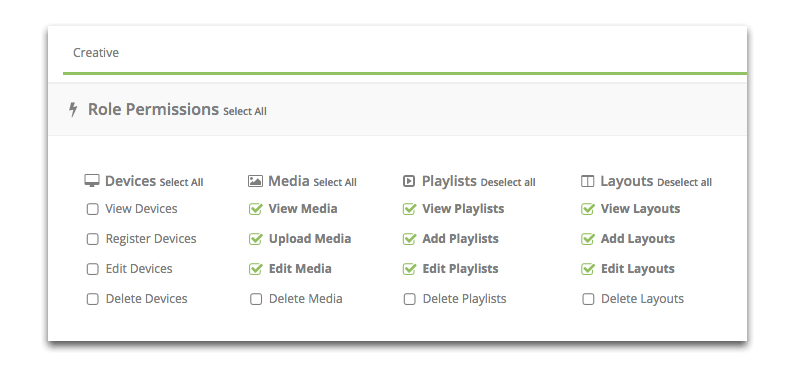
Creative Role:
Next up, we set up the Creative role that has access to: view, add and edit layouts and playlists as well as viewing, uploading and editing media items.
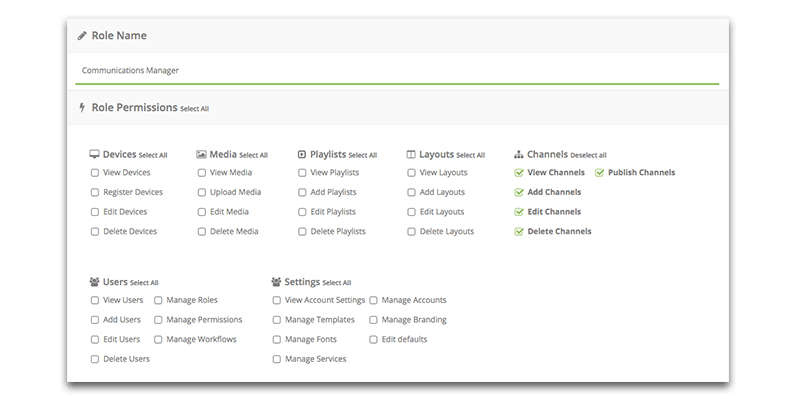
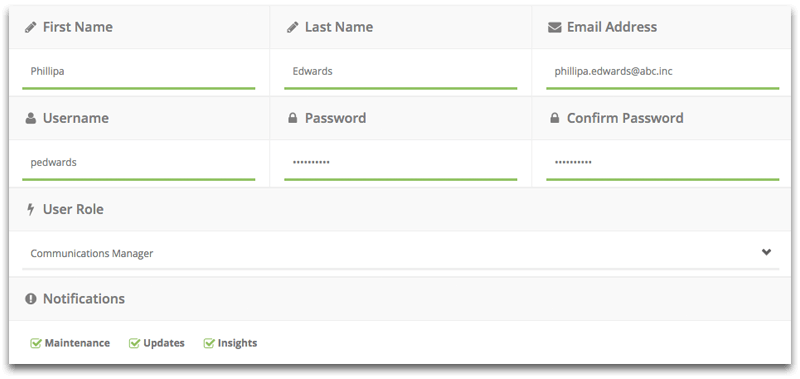
Communications Role:
Finally, we create the Communications role that has access to: view, add, edit, delete and publish channels (having the final say of what goes live.)
2. Create Users
Now that the various user roles have been set up, we need to add the relevant people from each office to the account. This is done via:
Ensure the ‘user role’ for each user is assigned correctly so that each new user is given the specific permissions assigned to their roles.
Got all the users set up? Good. Now let’s start adding them to the relevant groups.
3. Create User Groups
We’ve got our user roles defined and our users set up, now we need to segment the users into the relevant groups.
First, let’s set up a group for the London office, which can be done via:
Here we can define the Group Name, which we will call ‘London’. We then select which users we want to add to this group… which we will add:
- Chris Isaacs (Admin Role)
- Susan Wright (IT Technician role)
- Alan Holburn (IT Technician Role)
- Emma Jones (Creative Role)
- Darius Taylor (Creative Role)
- Phillipa Edwards (Communications Role)
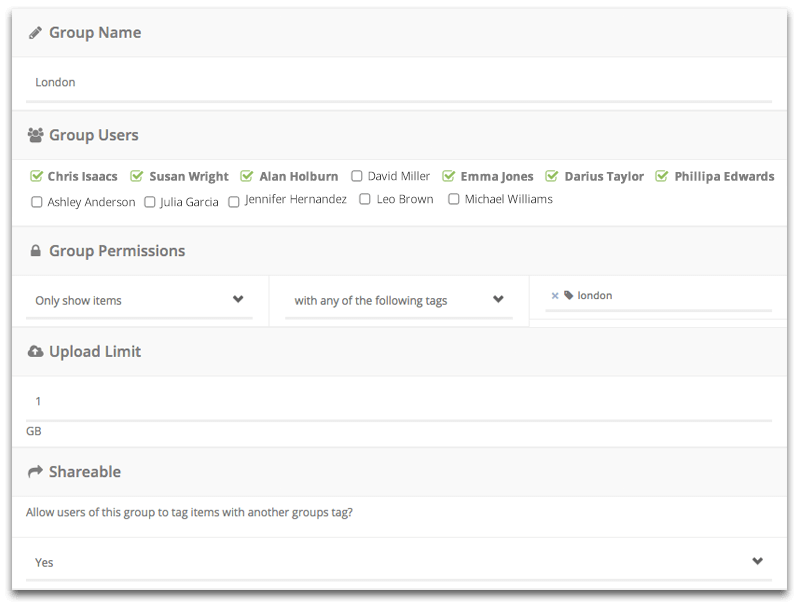
Next, we specify the Group Permissions – a very important part of the setup. This is where we set the permissions of the group and relevant tags. The options available are:
- Only Show items – with any of the following tags – ‘your tag here’.
Users in the group will only see items that have been tagged with any of the specified tags. In our example, the tag ‘London’. - Only Show items – with all of the following tags – ‘your tag here’.
Users in the group will only see items that have been tagged with all of the specified tags. - Exclude items – with any of the following tags – ‘your tag here’.
Users in the group will not be able to see any items that have been tagged with any of the specified tags. - Exclude items – with all of the following tags – ‘your tag here’.
Users in the group will not be able to see any items that have been tagged with all of the specified tags.
The next setting we can configure to the group is setting an Upload Limit. This is the amount of account storage allocated to the group. Every account gets 10GB free storage space and a portion of that can be allocated to a User Group. This allocated amount is sectioned off from the main account storage total to avoid any limit being exceeded.
The final setting we need to configure on the group is ‘Shareable’. If ‘yes’ is selected, this means that users in the London group could for example, tag a piece of media with the New York Group tag i.e. ‘New York’ and this item would then be shared with users in the New York group to see. If ‘no’ is selected, users in the group cannot share their items with other groups.
4. Assign Items to Groups
Now we’ve set up the user roles, added users and segmented them into groups we need to add items to those groups. We do this using tags.

Tags can be added to almost any item within . Users can tag folders and all items within folders, individual devices, media, layouts, channels, global playlists, plugins, account settings and various other elements within an account.
The London group has been set up to Only show items with any of the following tags: london. So, anything we now tag with ‘london’ will be visible to users in the London group with the relevant permissions (and of course, main account Admins that are unassigned to a group). For example:
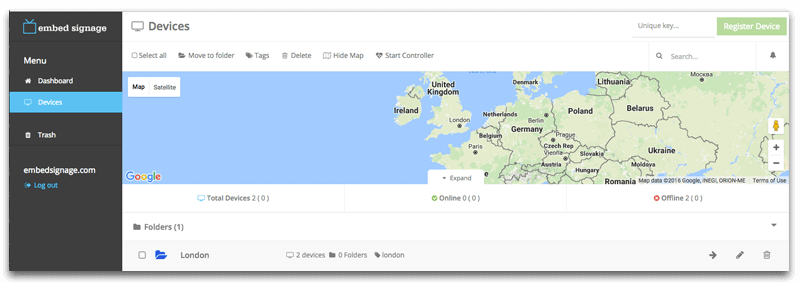
- Devices – A Folder with two devices tagged ‘london’ is now visible to Users with the IT Technician Role of the London Group
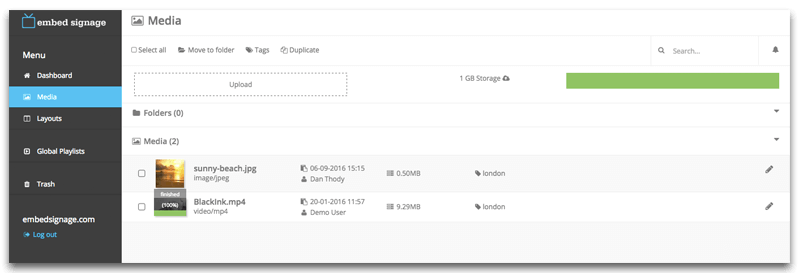
- Media – An image and video item tagged ‘london’ are now visible to users with the Creative Role of the London Group
- Channels – The Reception Channel tagged ‘london’ is now visible to users with the Communications Role of the London Group

And that’s it… Now simply repeat the process to configure all the necessary User Groups to segment the account.
Try for yourself!
Now you know how to use Advanced User Groups on an account, we invite you to give it a try today.
If you do not yet have an account, sign up for a free 28 day trial to try this and all of our other digital signage software features.